How to make Potions in Minecraft
To make a Potion in Minecraft, you need these things:
A Brewing Stand for brewing potions. Blaze Powder for fuelling your Brewing Stand. Glass Bottles to contain your Potions. A Water source nearby (Cauldron or Water block).
Every potion starts with a Water Bottle. To make a Water Bottle, just right-click on a water source with a Glass Bottle in your hand. There are three steps to making a Potion: Steps 2 and 3 can be done in reverse order if you like, but step 1 always comes first (except when making a Potion of Weakness, which doesn’t need an Awkward Potion).
Potion modifier ingredients
Adding Glowstone Dust to some Potions will increase the strength of the effect (usually doubling it). These Potions will have a “II” at the end of their name. Adding Redstone Dust to some Potions will extend the duration of the effect. These Potions will have a “+” at the end of their name. Adding Fermented Spider Eye to some potions will corrupt the effect, turning it into a new kind of Potion. Adding Gunpowder to any Potion will turn it into a Splash Potion. Instead of being drunk, a Splash Potion can be thrown on the ground, affecting everyone in an area around where it shatters. Adding Dragon’s Breath to any Splash Potion will turn it into a Lingering Potion. The effects of a Lingering Potion persist in the area for a short while after breaking, and while the effect is reduced it can also stack if you stay in the area.
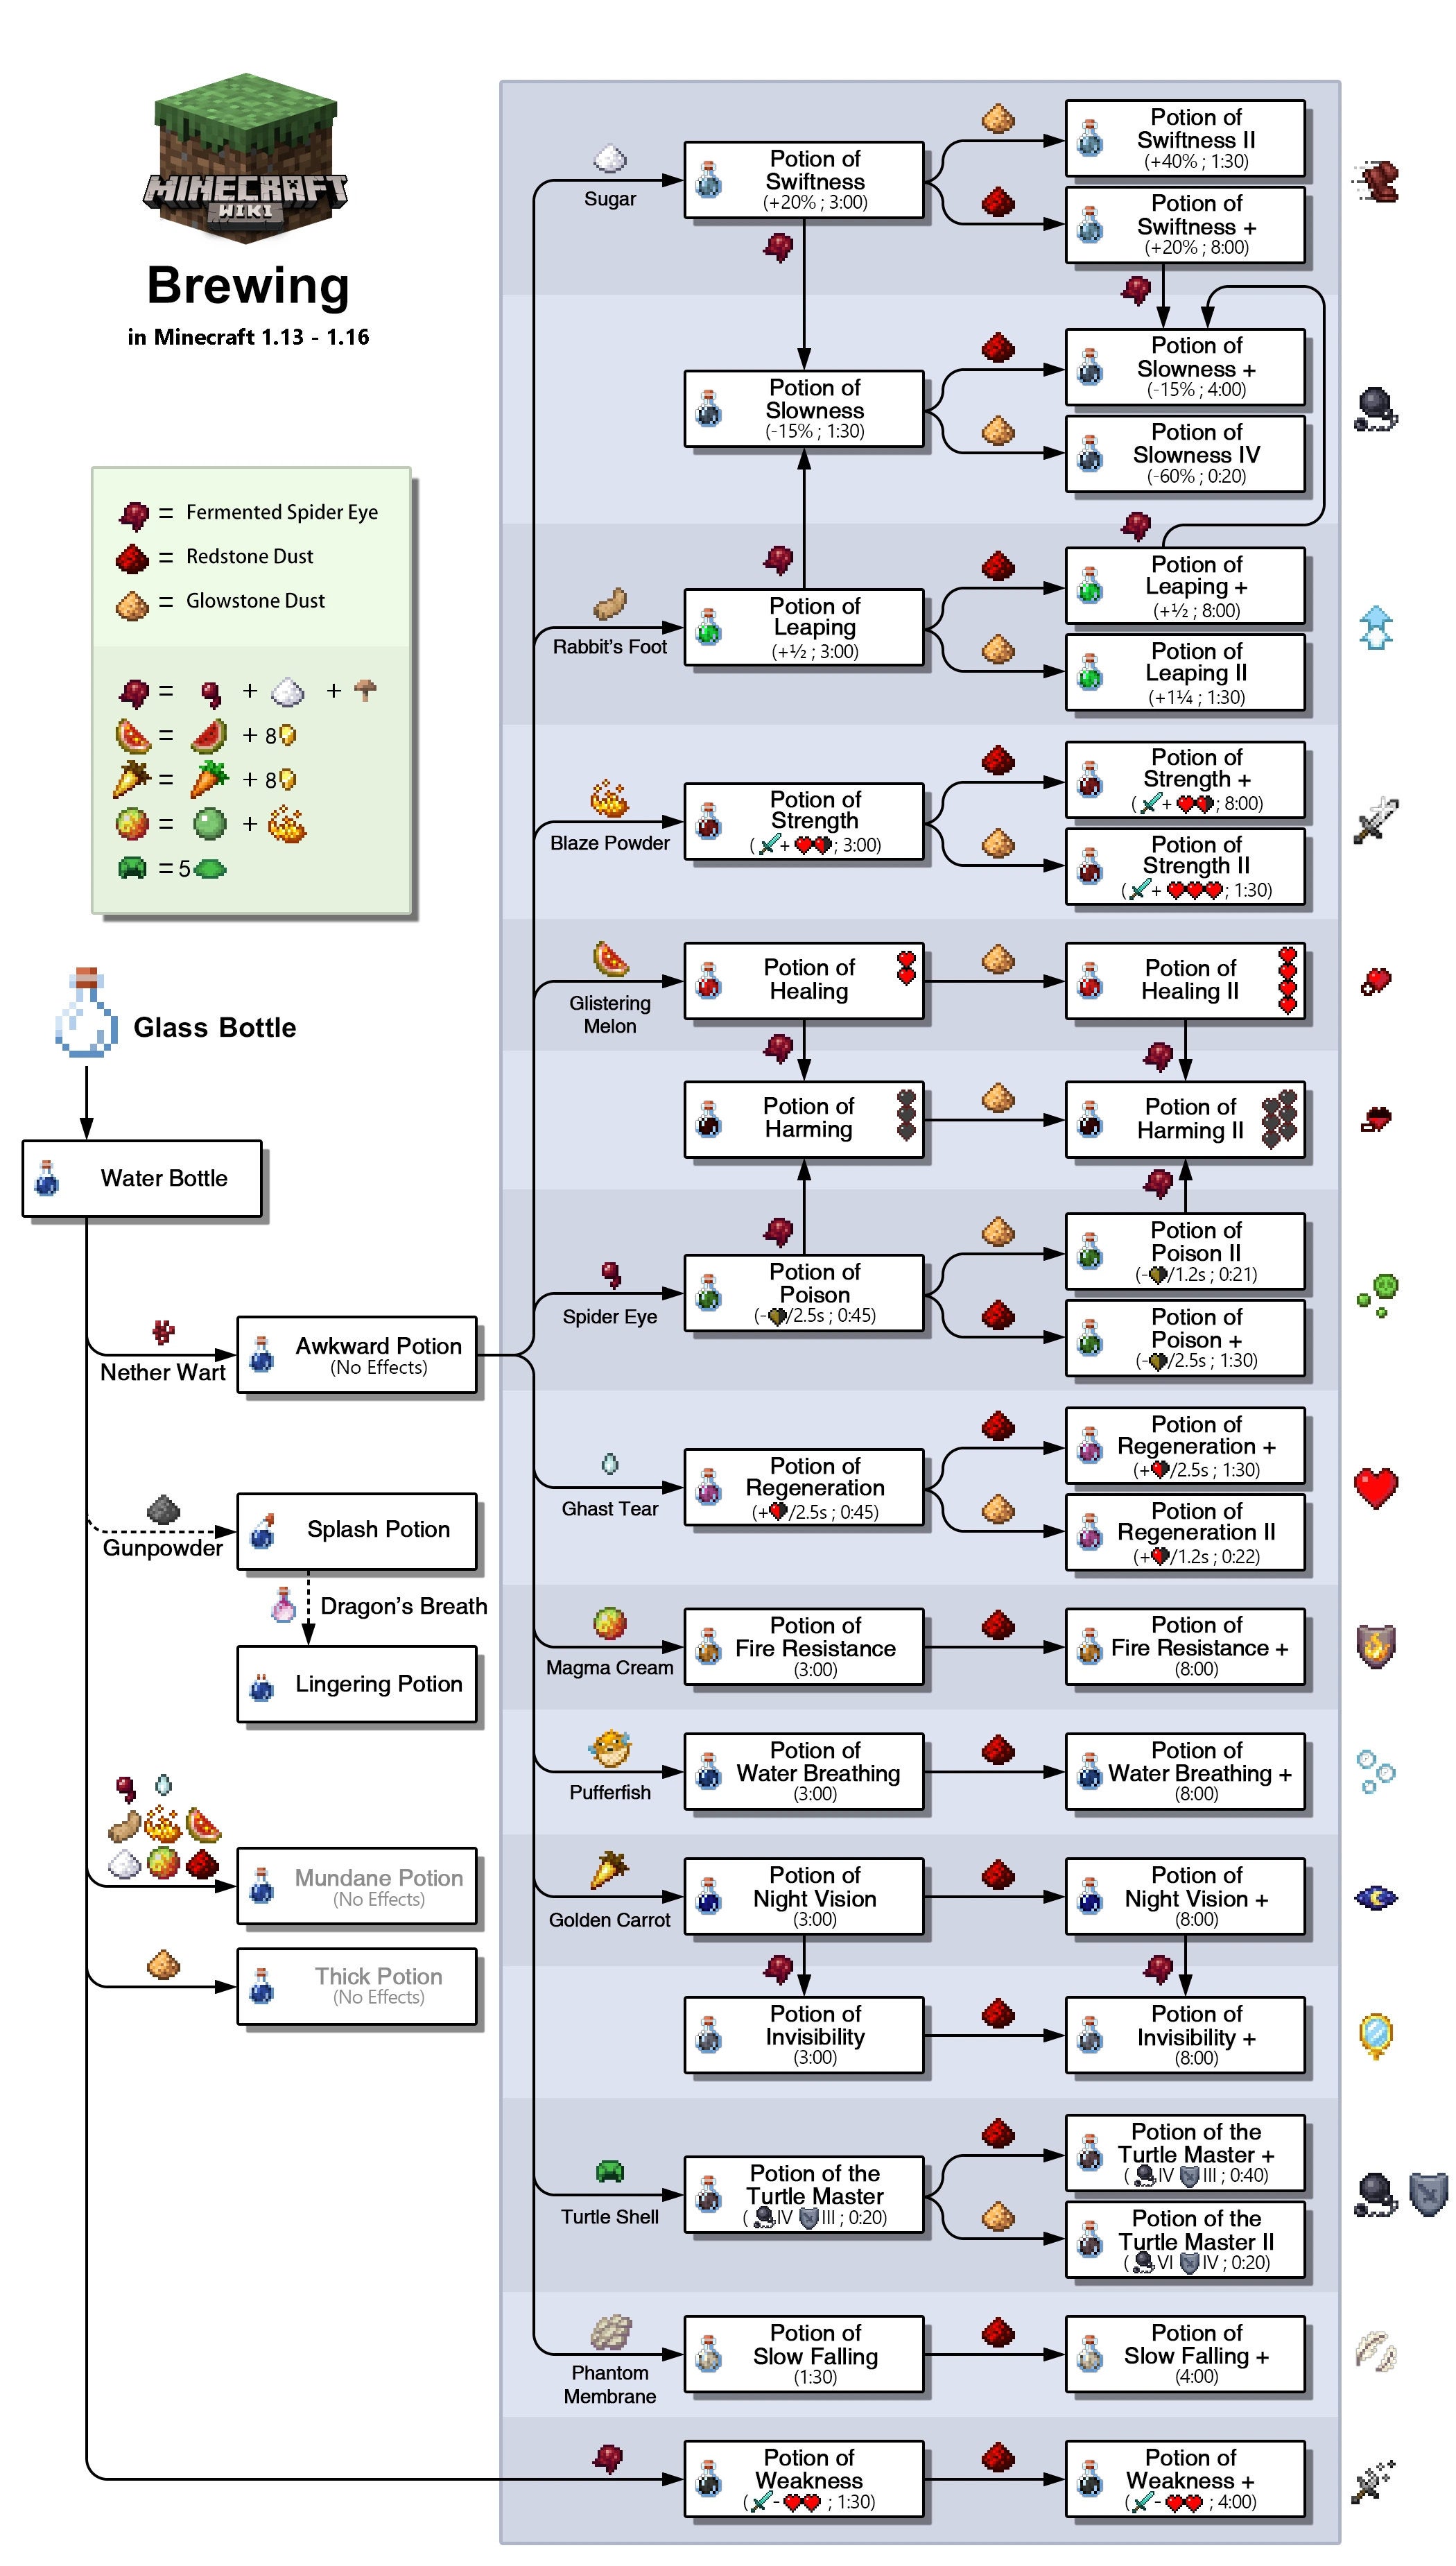
Minecraft Potion chart for 1.18
Here is a detailed Minecraft Potion brewing chart from the Official Minecraft Wiki which tells you how to create every kind of Potion: The chart doesn’t tell you how to create Splash or Lingering variations, but you can do that just by adding Gunpowder and Dragon’s Breath to each finished Potion. Check out our lists of the best Minecraft shaders and the best Minecraft texture packs to make your Minecraft world look as good as it can be!
All Minecraft Potion recipes
To brew a Potion in Minecraft, you need to add specific ingredients to a Water Bottle. You’ve already seen that ingredients like Gunpowder and Glowstone Dust can change how a Potion works, but the actual potion effect is created by adding one of the following ingredients:
Awkward Potion: Water Bottle + Nether Wart Potion of Healing: Awkward Potion + Glistering Melon Potion of Poison: Awkward Potion + Spider Eye Potion of Harming: Potion of Healing/Poison + Fermented Spider Eye Potion of Regeneration: Awkward Potion + Ghast Tear Potion of Strength: Awkward Potion + Blaze Powder Potion of Swiftness: Awkward Potion + Sugar Potion of Leaping: Awkward Potion + Rabbit’s Foot Potion of Slowness: Potion of Swiftness/Leaping + Fermented Spider Eye Potion of Night Vision: Awkward Potion + Golden Carrot Potion of Invisibility: Potion of Night Vision + Fermented Spider Eye Potion of Fire Resistance: Awkward Potion + Magma Cream (made using Slimeballs) Potion of Water Breathing: Awkward Potion + Pufferfish Potion of the Turtle Master: Awkward Potion + Turtle Shell Potion of Slow Falling: Awkward Potion + Phantom Membrane Potion of Weakness: Water Bottle + Fermented Spider Eye
Not all of these Potions can be turned into Extended or more powerful versions of themselves, but all of them can be turned into Splash and Lingering versions. You can also mix-and-match the modifiers that are allowed, for example to create an Extended Lingering Potion of Poison, or a Splash Potion of Healing II. Many of these Potions are extremely powerful tools for taking on tough Minecraft mobs. They also form an important part of PvP fights if you’re playing on a Minecraft server; the battle is often decided by who has the Potions of Strength and Regeneration to spare. It’s worth noting that the Potion of Invisibility won’t help you escape the Warden that will arrive in 1.19, also known as The Wild Update.
How to make a Brewing Stand
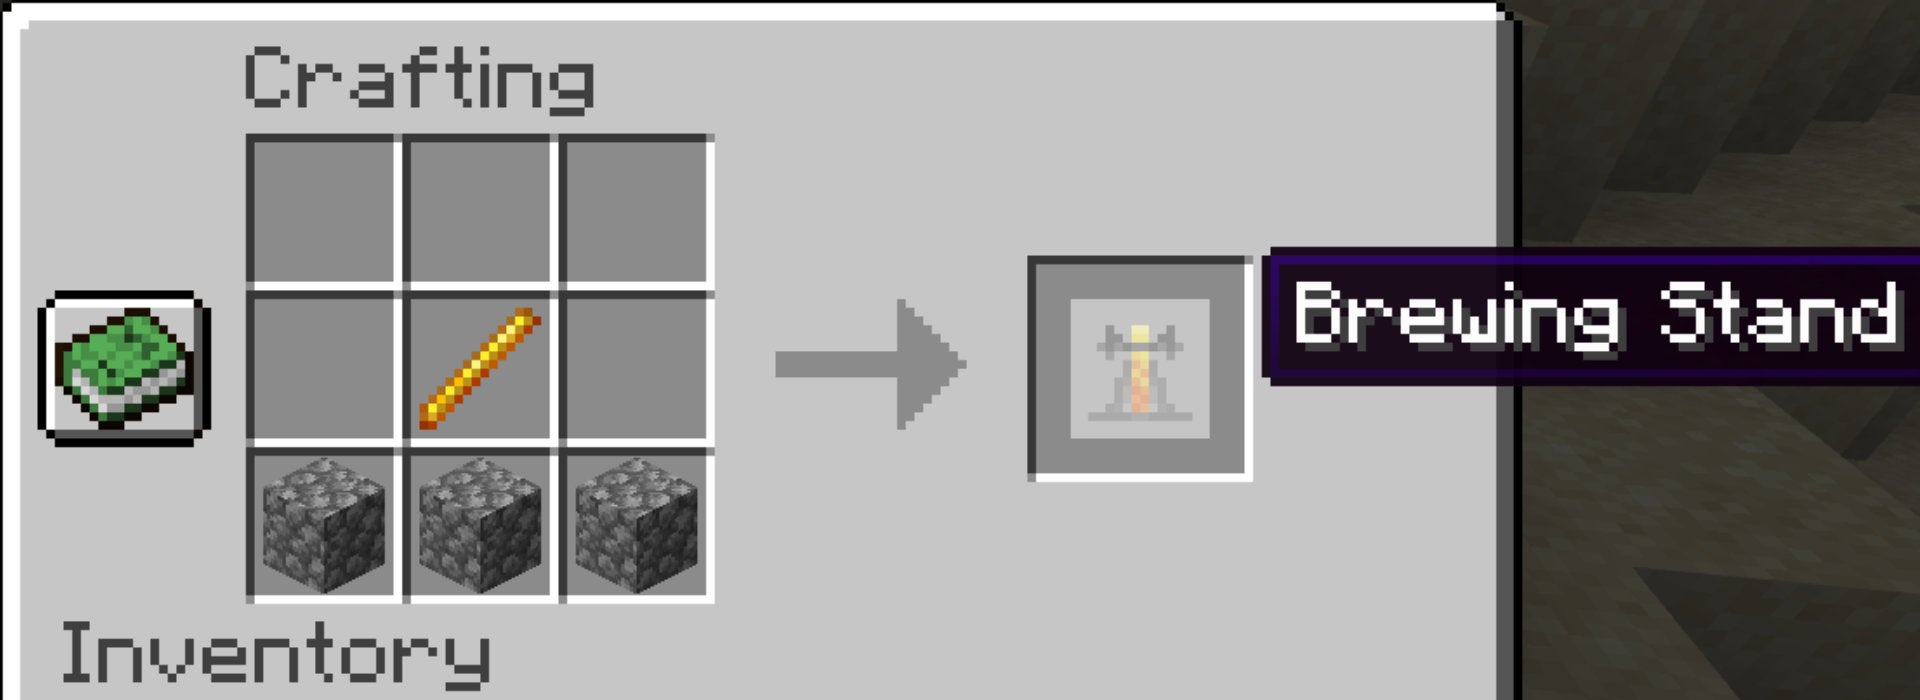
To make a Brewing Stand, you must combine 1 Blaze Rod and 3 Cobblestone in a Crafting Table. Place the 3 Cobblestone in a row, with the Blaze Rod just above it in the centre, like so: Place the Brewing Stand on the ground and right-click it to open the brewing window. It looks complex at first but it’s actually very simple:
The far-left slot is where you add Blaze Powder to fuel your brewing, just like putting Coal in a Furnace. The bottom three slots are where you place the bottles of potions that you want to modify. The top slot is where you place an ingredient that you’re using to alter the effects of the potions below.
Every time you add a new ingredient to a potion, it’ll take 20 seconds of brewing for the effect to occur. But with three potion slots at the bottom, you can brew multiple potions at once to save time. Just remember that you’ll need Blaze Powder to keep the Brewing Stand fuelled and working! That’s really all you need in order to start making Potions. It’s not like enchantments where you need a whole room in your Minecraft house dedicated to enchanting tables and bookshelves. A single, simple Brewing Stand will do - although a cool tower or castle would certainly provide an epic fantasy aesthetic! That wraps up our guide to brewing potions in Minecraft. If you’re not quite at the stage of venturing into the Nether, you may want to check our page on how to find Diamonds in Minecraft. Alternatively, if you’re looking for easy access to the Nether from the start, be sure to consult our list of the best Minecraft seeds. Alternatively, if you just want to use Potion effects in Creative Mode, find out how with our Minecraft commands guide - or expand the possible number of Potions you can make with Minecraft mods!

